Using AI to Automate Helm Chart values.yaml Merges

Managing Helm charts at scale can become tricky. Each new application or chart release often comes with an updated
values.yaml file containing new configuration properties. Rather than copying files or manually re-applying overrides, we use LLMs to merge new defaults and generate reviewer-friendly PRs.

Workflow with GitHub Actions

Here’s the GitHub Actions workflow that runs the merge job and opens a PR:

# .github/workflows/helm-values-merge.yml
name: Helm Values Merge

on:
  workflow_dispatch:
  schedule:
    - cron: "0 6 * * 1" # weekly check for chart updates

jobs:
  merge-values:
    runs-on: ubuntu-latest

    steps:
      - name: Checkout repo
        uses: actions/checkout@v4

      - name: Set up Python
        uses: actions/setup-python@v5
        with:
          python-version: "3.11"

      - name: Install dependencies
        run: |
          pip install pyyaml requests

      - name: Fetch latest Helm chart values.yaml
        run: |
          CHART_NAME=my-app
          CHART_REPO=https://charts.example.com
          CHART_VERSION=$(helm search repo $CHART_NAME --repo $CHART_REPO -o yaml | yq '.[0].version')
          mkdir -p charts
          helm pull $CHART_REPO/$CHART_NAME --version $CHART_VERSION --untar -d charts
          cp charts/$CHART_NAME/values.yaml new-values.yaml

      - name: Run LLM merge
        run: |
          python scripts/merge_values.py \
            --existing ./team-values.yaml \
            --new ./new-values.yaml \
            --out ./team-values-merged.yaml

      - name: Create PR
        uses: peter-evans/create-pull-request@v6
        with:
          commit-message: "chore: merge Helm values from latest chart"
          branch: "auto/helm-values-merge"
          title: "chore: merge Helm values from latest chart"
          body: |
            This PR merges new defaults from the latest chart into team-values.yaml.
            Generated via LLM (Amazon Q + Claude + Saunet pipeline).

Process Diagram (HTML/CSS — WordPress-friendly)

Inline, responsive diagram that should render in WP without SVG support:

Helm Chart Repo
LLM Merge Job

(Amazon Q, Claude, Saunet)

GitHub Pull Request
Deploy via ArgoCD

Conclusion

By using an LLM-assisted merge pipeline and PR-based workflow we get the best of both worlds: automated plumbing plus human review. The HTML diagram above will render on most WordPress installs without requiring SVG uploads or extra plugins.

Enforcing AWS ElastiCache (Valkey) Best Practices with Kyverno + Crossplane + GitOps


In my
previous post on managing AWS ElastiCache (Valkey) clusters with Crossplane and GitOps
, I showed how we can stand up clusters entirely through
declarative YAML. One of the biggest wins of that approach is that everything becomes code.
That means we can encode our company’s best design patterns as policies and automatically apply them across every cluster—past, present, and future.

Why Kyverno?

There are many ways to validate and enforce Crossplane resources. We chose Kyverno because it speaks Kubernetes-native YAML, it’s easy to read,
and it supports both soft (audit) and hard (enforce) modes. Our rollout strategy:

  1. Start in Audit mode to see which existing stacks violate standards without breaking deploys.
  2. Fix the drift (massage the clusters/stacks) until everything passes.
  3. Flip to Enforce to block future non-compliant changes.

If you’re new to Crossplane and want to understand how we provision Valkey clusters declaratively,
I recommend reading the
step-by-step Crossplane + GitOps guide here
.

Design Choice: One Validation per Rule

When we first built our cluster policy, we wanted a simple way to surface a clear, actionable list of problems.
We landed on a structure where we can have multiple rules, but each rule performs exactly one validation.
If we need another validation, we create another rule. This gives us:

  • Custom error messages that read like a to-do item for developers.
  • Cleaner visualization in dashboards (see Policy Reporter below).
  • Modular maintenance—toggle, tune, or extend rules independently.

Visualizing Compliance with Policy Reporter

We tested a few UIs and found the Policy Reporter UI makes it easiest to review policy findings.
It’s effectively a categorized to-do list by policy, namespace, and resource. Developers (and DBAs) can quickly drill into
just the ElastiCache items and see exactly what needs to be fixed.

Helpful Policy Annotations

We use Kyverno’s annotations to improve grouping and filtering in reports:

metadata:
  name: replicationgroup-policy
  annotations:
    policies.kyverno.io/title: ReplicationGroup Policy
    policies.kyverno.io/category: ElastiCache
    policies.kyverno.io/severity: medium
    policies.kyverno.io/subject: ReplicationGroup Crossplane

With a dedicated category (e.g., ElastiCache), DBAs can filter the Policy Reporter UI
to the most relevant findings for them.

Full Example: ClusterPolicy for Crossplane ReplicationGroup

Below is a simple, end-to-end example that validates several core standards. We start in Audit mode
to gather findings without blocking deploys. After all clusters pass, switch to Enforce to prevent non-compliant changes going forward.

apiVersion: kyverno.io/v1
kind: ClusterPolicy
metadata:
  name: replicationgroup-policy
  annotations:
    policies.kyverno.io/title: ReplicationGroup Policy
    policies.kyverno.io/category: ElastiCache
    policies.kyverno.io/severity: medium
    policies.kyverno.io/subject: ReplicationGroup Crossplane
    policies.kyverno.io/description: "Validates Crossplane ReplicationGroup resources for ElastiCache to ensure compliance with organizational standards, security requirements, and cost optimization guidelines. This includes enforcing approved instance types, encryption requirements, and other configuration standards. The resource for the policy can be found at https://github.ancestry.com/infrastructure/containers-applicationbases/tree/master/applications/kyverno/templates/deploy/policies"
spec:
  validationFailureAction: Audit
  background: true
  rules:
    - name: validate-replication-group
      match:
        any:
          - resources:
              kinds:
                - elasticache.aws.upbound.io/v1beta2/ReplicationGroup
      validate:
        message: "ReplicationGroup validation failed: Instance type must be in the r6g family. Current instance type is '{{ request.object.spec.forProvider.nodeType }}'"
        pattern:
          spec:
            forProvider:
              nodeType: "cache.r6g.*"

    - name: validate-encryption
      match:
        any:
          - resources:
              kinds:
                - elasticache.aws.upbound.io/v1beta2/ReplicationGroup
      validate:
        message: "Encryption at rest must be enabled"
        pattern:
          spec:
            forProvider:
              atRestEncryptionEnabled: true

    - name: validate-transit-encryption
      match:
        any:
          - resources:
              kinds:
                - elasticache.aws.upbound.io/v1beta2/ReplicationGroup
      validate:
        message: "Encryption in transit must be enabled"
        pattern:
          spec:
            forProvider:
              transitEncryptionEnabled: true

    - name: validate-management-policy
      match:
        any:
          - resources:
              kinds:
                - elasticache.aws.upbound.io/v1beta2/ReplicationGroup
      validate:
        message: "ReplicationGroup is still in Observe mode and not being managed by Crossplane"
        pattern:
          spec:
            managementPolicies: "!Observe"

Switching from Audit to Enforce

Once your dashboards show green across the board, flip the policy to hard enforcement by changing a single field:

spec:
  validationFailureAction: Enforce

Developer Experience Tips

  • Name rules by intent (validate-encryption, validate-transit-encryption, etc.) so it’s obvious what failed.
  • Write messages like tickets—tell the developer exactly what to fix and (if useful) echo the current value using variables like {{ request.object.spec.forProvider.nodeType }}.
  • Keep rules atomic (one validation per rule) for better UX in Policy Reporter and simpler maintenance.
  • Batch remediation by category (e.g., all ElastiCache issues) so DBAs and app teams can focus on what they own.

Wrap-Up

With Crossplane defining ElastiCache (Valkey) as YAML and Kyverno validating those definitions, we get a clear, automated path to standardization.
Start in Audit to learn, remediate the drift, then move to Enforce for durable guardrails—no more snowflake clusters.

If you haven’t seen how we provision these clusters in the first place, check out the companion post:

How to Manage AWS Valkey Clusters with Crossplane and GitOps
.

How to Manage AWS Valkey Clusters with Crossplane and GitOps


How to Manage AWS Valkey Clusters with Crossplane and GitOps

Managing AWS Valkey clusters (the open Redis fork) can be done declaratively with Crossplane, bringing the benefits of GitOps to DBAs and platform engineers. This guide walks through importing an existing Valkey cluster into Crossplane, configuring it with Kustomize, and deploying with Argo CD.


Step 1 — Import Existing Valkey Clusters into Crossplane

To bring an already-existing Valkey ElastiCache cluster under Crossplane management, you’ll need to use the crossplane.io/external-name annotation. This ensures Crossplane matches the resource in AWS before switching from observe to manage.

apiVersion: elasticache.aws.upbound.io/v1beta2
kind: ReplicationGroup
metadata:
  name: example-authz
  annotations:
    crossplane.io/external-name: "example-authz"
spec:
  forProvider:
    region: us-east-1
    engine: valkey
    engineVersion: "8.0"
    ...

Step 2 — Manage Valkey Clusters with Kustomize and Argo CD

We use Kustomize to organize Valkey cluster manifests, and Argo CD AppSets to automate deployments across EKS clusters:

kind: Kustomization
apiVersion: kustomize.config.k8s.io/v1beta1
resources:
  - replicationgroup.yaml

Step 3 — Configure Crossplane Provider for AWS

The ProviderConfig sets up Crossplane with the correct AWS IAM role (via IRSA). This role is scoped with permissions for ElastiCache only:

apiVersion: aws.upbound.io/v1beta1
kind: ProviderConfig
metadata:
  name: org-l3-provider
spec:
  assumeRoleChain:
    - roleARN: arn:aws:iam::123456789012:role/crossplane-deployer
  credentials:
    source: IRSA

Step 4 — Install Crossplane ElastiCache Provider

Finally, install the AWS ElastiCache provider to manage Valkey resources:

apiVersion: pkg.crossplane.io/v1
kind: Provider
metadata:
  name: provider-aws-elasticache-upbound
spec:
  package: xpkg.crossplane.io/crossplane-contrib/provider-aws-elasticache:v1.23.0
  revisionActivationPolicy: Automatic

Benefits of Using Crossplane for Valkey

  • GitOps for DBAs: Manage Valkey clusters declaratively in Git.
  • Compliance & Security: Start in observe mode, then enforce policies.
  • Cost Efficiency: Run Valkey on ARM for reduced cost.

By using Crossplane to manage AWS Valkey clusters, DBAs gain consistency, compliance, and a GitOps workflow that reduces manual management overhead.


Next up: Using Kyverno to enforce compliance across all Valkey clusters, including engine versions, encryption, tagging, and maintenance windows.

Karpenter vs ECK Elasticsearch

AWS Karpenter vs ECK Elasticsearch

Fixing ECK Elasticsearch Cluster Issues with Karpenter and PodDisruptionBudgets

Recently, we ran into an issue with our Kubernetes cluster where Karpenter was updating AMIs. While this normally helps keep nodes up-to-date, in our case it was replacing nodes faster than Elasticsearch could recover. The result was a large Elasticsearch cluster that ended up in a state where all pods were stuck in Pending.

This happened because the cluster could not maintain enough master pods online at the same time to form a quorum. Without quorum, Elasticsearch cannot elect a leader or coordinate writes, which effectively stalls the entire system.

Initial Symptoms

When this problem hit, the cluster looked deceptively healthy at first glance. All the nodes were technically “running,” but the Elasticsearch pods never reached a true Running state. Looking deeper into the pod logs revealed repeated messages that the nodes could not discover enough masters to join the cluster.

Our Attempted Fixes

Restarting pods one by one didn’t work. In fact, it often made the problem worse, since the cluster still couldn’t reach quorum with staggered pod restarts. Elasticsearch remained stuck, waiting for enough master nodes to reappear.

The eventual solution was drastic but effective:

kubectl -n <namespace> delete po --all

This forced all Elasticsearch pods in the namespace to restart at the same time. By doing so, Elasticsearch was able to reinitialize its bootstrap discovery process, elect new masters, and reform the cluster correctly. Thankfully, no data was lost during this reset.

Why We’re Cautious

We’re always hesitant to do full cluster restarts like this. In the past, we’ve seen situations where cached data issues forced us to delete underlying PVCs (persistent volume claims), which is a last-resort scenario because it carries the risk of data loss. In this case, we were lucky—the cluster healed itself without having to delete PVCs—but this experience highlighted the need for better safeguards.

Preventing This in the Future

The real lesson here is that clusters running stateful applications like Elasticsearch need properly configured PodDisruptionBudgets (PDBs). A PDB ensures that Kubernetes (or in our case, Karpenter) doesn’t evict or replace too many pods at once, which would prevent Elasticsearch from maintaining quorum.

Here’s an example PDB definition we now apply to our clusters:

apiVersion: policy/v1
kind: PodDisruptionBudget
metadata:
  name: elasticsearch-pdb
  namespace: elasticsearch
spec:
  maxUnavailable: 1
  selector:
    matchLabels:
      elasticsearch.k8s.elastic.co/cluster-name: bgt-bps

With this in place, Karpenter (or any node autoscaler) will be forced to wait until an Elasticsearch pod has fully come back online before it can evict another. This ensures the cluster always has enough master nodes available to maintain quorum, significantly reducing the risk of a total cluster stall.

Conclusion

This incident was a good reminder that while Kubernetes and tools like Karpenter provide incredible automation, stateful workloads like Elasticsearch require extra guardrails. Without PodDisruptionBudgets, an automated upgrade cycle can accidentally take down an entire cluster.

The combination of careful monitoring, safe disruption policies, and a solid disaster-recovery plan ensures that Elasticsearch can run reliably—even in the face of automated infrastructure updates.

Solar Panels For EV Cars

Solar Car Dream

When I was a kid, I often dreamed of having a car that was fully electric and could run on solar power in real time. Imagine never needing to stop to recharge—just endless travel powered by the sun. A vehicle like this would allow you to roam the world without ever worrying about fuel stations, gas prices, or plugging in overnight.

Fast forward to today: nearly every major car company is producing electric vehicles (EVs), largely thanks to Tesla’s success in proving the market. EVs are now more popular and financially accessible than ever before. That naturally leads to the question:
Can we put solar panels on EVs to drive them in real time using only sunlight?

Feasibility

To figure this out, we’ll look at a real-world example using Tesla data and standard solar cell efficiency numbers.

Tesla Real-Time Power Requirement

According to Tesla energy usage statistics, a Tesla consumes about 34 kilowatt-hours of electricity to drive 100 miles. That’s roughly the energy requirement we need to meet if we want to run the car on sunlight alone.

Surface Area of a Tesla Vehicle

Let’s estimate the surface area of a Tesla sedan that could reasonably be covered with solar panels. For simplicity, we’ll just use the roof and upper body where direct sunlight hits, and balance out glass/window areas with some side paneling.


Tesla vehicle dimensions

Using Tesla’s published vehicle dimensions:

  • Length: 196 in
  • Width: 77.3 in (excluding mirrors)

Surface area (top view) = 77.3 in × 196 in ÷ 144 (to convert to square feet).
That works out to about 105.3 square feet of usable solar surface.

Solar Power Generated Per Square Foot

Modern solar cells are around 15% efficient and typically generate about
15 watts per square foot in direct sunlight.

That means our 105 sq. ft. of solar coverage could generate approximately:
105 × 15 = 1,575 watts (1.575 kW) of power per hour.

Putting the Pieces Together

Here’s the problem: a Tesla requires about 34 kWh to travel 100 miles.
But our entire car surface covered in solar panels only provides 1.575 kW per hour.

That’s just 4.6% of the power needed to drive in real time under perfect sunlight conditions. In other words, you’d still need an additional 32.5 kW to make the car fully solar-powered.

To generate that with current solar technology, you’d need a trailer covered in solar panels with a surface area of about 2,166 square feet—roughly the size of a small house!

Clearly, while the dream is exciting, the math shows that it’s not currently realistic.

Future Possibilities

Does that mean solar cars will never happen? Not necessarily. As solar efficiency improves—moving toward 30–40% or even higher—vehicles may someday harvest enough energy directly from their panels to meaningfully extend driving range.

In fact, companies like Aptera and Lightyear are already experimenting with ultra-efficient EVs that integrate solar panels into their designs. While they don’t yet achieve “infinite driving,” they do gain dozens of free miles per day from sunlight alone.

So for now, my childhood dream of a truly solar-powered car remains out of reach. But given the pace of technology, it may only be a matter of time before driving on sunshine becomes more than just a dream.

ECK – Unify Kibana and Elasticsearch Versions

Managing Elasticsearch and Kibana Versions with ECK, ArgoCD, and Kustomize

We use the ECK operator to manage our Elasticsearch clusters. It does a great job and integrates well with our GitOps workflow.

All of our deployments run through ArgoCD, and we use Kustomize to tie the pieces together. This works smoothly in most cases, but there is one recurring problem.

The Problem

When updating Elasticsearch, we sometimes forget to update Kibana. The issue is that Kibana is defined in a separate YAML, and with so many clusters it’s easy for the versions to fall out of sync.

Why This Is a Problem

Elasticsearch and Kibana versions need to be compatible. If Elasticsearch is upgraded but Kibana isn’t, things break. With dozens of clusters, missing an update becomes a very real risk.

What we need is a form of inheritance—a single place to define the version that applies to both Elasticsearch and Kibana.

The Solution

The solution is to use the replacements function in the Kustomization resource. This ensures that the version defined in the Elasticsearch resource is automatically propagated to Kibana.

kind: Kustomization
apiVersion: kustomize.config.k8s.io/v1beta1
replacements:
  - source:
      kind: Elasticsearch
      name: bgt-bps
      fieldPath: spec.version
    targets:
      - select:
          kind: Kibana
        fieldPaths:
          - spec.version

Now, the Elasticsearch YAML becomes the authoritative source for the version. Whenever ArgoCD syncs, the spec.version value is copied from Elasticsearch to Kibana automatically. This prevents drift and ensures the two always stay aligned.

AI Longhorn Destruction + Solution

Longhorn PVC Mounting Issue and Backup Setup

Recently I ran into a persistent error with Longhorn while trying to attach a PVC. The error kept repeating and initially, I thought I needed the v2 engine—but it turns out the real culprit was multipath being created. The
Longhorn KB article on troubleshooting multipath explained exactly how to fix it.

Original Error

This was the original error I kept seeing:

MountVolume.MountDevice failed for volume "pvc-4b04c380-e38a-4462-a71a-875a16b53c9d":
rpc error: code = Internal desc = format of disk "/dev/longhorn/pvc-4b04c380-e38a-4462-a71a-875a16b53c9d" failed:
type:("ext4") target:("/var/lib/kubelet/plugins/kubernetes.io/csi/driver.longhorn.io/.../globalmount")
options:("defaults") errcode:(exit status 1)
output: mke2fs 1.47.0 reports disk is in use; will not make a filesystem here!

I tried several fixes, but none worked. Every time I would try and restart all longhorn pods like iAI recommended the errors became like a game of wacamole. Randomly other pvcs would have the same issue. Eventually, AI Claude 4 led me down a path that deleted all the Longhorn drives, and I had no backups—so this was a costly lesson.

Final Solution

The final solution was to go on each node and set the multipath setting as explained in the article. I also realized the importance of having a backup solution in place.

MariaDB Backups to S3

For some databases, I have a MariaDB backup YAML running that sends all objects to S3. Here’s an example (sensitive data sanitized):

apiVersion: k8s.mariadb.com/v1alpha1
kind: Backup
metadata:
  name: mariadb-backup
spec:
  mariaDbRef:
    name: mariadb
  storage:
    s3:
      bucket: my-bucket
      prefix: mariadb-backups/
      endpoint: s3.amazonaws.com
      region: us-east-1
      tls:
        enabled: true
      accessKeyIdSecretKeyRef:
        name: aws-credentials
        key: ACCESS_KEY_ID
      secretAccessKeySecretKeyRef:
        name: aws-credentials
        key: SECRET_ACCESS_KEY
  schedule:
    cron: "0 2 * * *"
  maxRetention: "720h"  # 30 days
  compression: gzip
  databases:
    - mariadb
    - recisphere

Longhorn Backup Setup

For Longhorn, I first updated the values.yaml with the backup settings (sensitive data sanitized):

defaultSettings:
  backupTarget: "s3://user@us-east-1/longhorn-backups"
  backupTargetCredentialSecret: "s3-backup-secret"
  allowRecurringJobWhileVolumeDetached: ~
  createDefaultDiskLabeledNodes: ~
  defaultDataPath: /mnt/sda

Next, I created a recurring backup job:

apiVersion: longhorn.io/v1beta2
kind: RecurringJob
metadata:
  name: daily-backup
  namespace: longhorn-system
spec:
  cron: "0 2 * * *"
  task: backup
  groups: ["daily-backup"]
  retain: 7
  concurrency: 2

Finally, I annotated all PVCs with the recurring job label:

kubectl get pvc --all-namespaces --no-headers | while read ns name rest; do kubectl label pvc $name -n $ns recurring-job-group.longhorn.io/daily-backup=enabled --overwrite; done
metadata:
  labels:
    recurring-job-group.longhorn.io/daily-backup: enabled

Verification

Now the Longhorn UI shows a backup target connected to S3, and backups appear there. The cron job handles automatic backups, and you can view the job pod outputs in Kubernetes for debugging if necessary.

Lessons Learned

  • Always verify multipath settings on nodes to avoid PVC mount issues.
  • Never rely solely on local storage—set up automated backups for both databases and Longhorn volumes.
  • Test backup restores periodically to ensure the data is recoverable.
  • Use short, descriptive PVC names and recurring job labels to avoid confusion in large clusters.

Enabling Windows nodes inside an EKS cluster on AWS.

Description

We recently went about adding windows nodes for some legacy dotnet stacks at Ancestry. As part of this we followed the AWS documentation to enable windows. We also use Karpenter to handle the scheduling and decided to make a new provisioner for just windows. After following the docs a new windows node came up but there was an error that prevented the pods from obtaining an ip address.

Warning FailedCreatePodSandBox 3m21s (x4555 over 19h) kubelet (combined from similar events): Failed to create pod sandbox: rpc error: code = Unknown desc = failed to setup network for sandbox "a760b4d93ed0937341cb5083547b0b8a197a280a66ad3d0cb096562ab2a237a1": plugin type="vpc-bridge" name="vpc" failed (add): failed to parse Kubernetes args: failed to get pod IP address windows-test-5bbc88b5f9-vzgfc: error executing k8s connector: error executing connector binary: exit status 1 with execution error: pod windows-test-5bbc88b5f9-vzgfc does not have label vpc.amazonaws.com/PrivateIPv4Address

Solution

My suspicion was there was something in the control plane that can’t be seen from kubectl. After talking with AWS support through several rounds there is an admission webhook in the control plane that is triggered by setting the nodeSelector. The docs say that needs to be set, but I thought it was just to set nodeaffinity and not the other field.

nodeSelector:
        kubernetes.io/os: windows
        kubernetes.io/arch: amd64

Once we added this to the pod spec section of the deployment yaml the pods were able to successfully be triggered by the mutating webhook to add the right annotations vpc.amazonaws.com/PrivateIPv4Address to the pod and it was able to get an ip address succesffully.

Birth of a Liberal

Abstract

I just want to begin by expressing my gratitude for this country where I live, The United States of America. It really is a land of immense freedom and opportunity. I love the constitution and feel that it really is an inspired document. I consider myself somewhere in the middle of the political spectrum. I do not like extremist views in either direction, conservative or liberal. The following is just my personal viewpoints and opinions on how liberals and conservatives are the same people just separated by time. Liberal views on the political spectrum are just a natural evolution of a progression where people live.

How to become liberal

The Wild West

In 1803 the United States made one of the largest land purchases in history known as “The Louisiana Purchase.” This purchase was for what is now the Midwest states such as Iowa, South Dakota, Kansas, Oklahoma, and of course Louisiana. Several years after this purchase the rest of the west joined the union. California through Utah came from the Mexican Cession in 1848, Oregon and Washington joined in 1846, and Texas joined the union in 1845. The United States had a plethora of land that needed people to fill it, and thus the Homestead Act was introduced in 1862 by President Lincoln. This act allowed people to claim up to 160 acres that was currently unclaimed at the time for free. The only requirements were the owners had to live on the land, improve it, and pay the registration fees. The Homestead Act caused many people to move west with the dream of owning their own land for free.

Try and imagine living during this time and deciding to travel west to take advantage of the free land. You sell everything you have, which isn’t much by today’s standards. You buy a wagon that is pulled by either horses or oxen. You load the wagon with food, seeds for growing future food, tools, a gun with some ammunition, and maybe a few changes of clothes. Early in the spring you take your family and begin walking from one of the eastern states and traveling west. The average distance the pioneers would travel in one day was 15 miles. To cover the number of miles needed to head west this means you will be traveling for six months. There is an old game called The Oregon Trail that accurately describes life as a pioneer heading west.

After six months of traveling, you find a location that you can call home. There is a small town 15 miles away where you register your land. You have no house, there is now hospital, there are no neighbors. Just your small family and the local wildlife for company. There is much work to be done as winter is coming. You need to build a cabin or house to protect your family. You need to dig a well so you can pull fresh water. After winter comes and goes you need to get a harvest started, which means plowing the fields and preparing them to be farmed. There is a near endless amount of work to be done.

Living one 160 acres by yourself means you are the only rule and law around. With the culture at that time it was perfectly acceptable to shoot and kill any intruder or stranger that came to your property. Remember you are the only person living out there. You are the law. Whatever you say becomes the law. You have no neighbors to worry about. You in essence have the freedom to do anything you want.

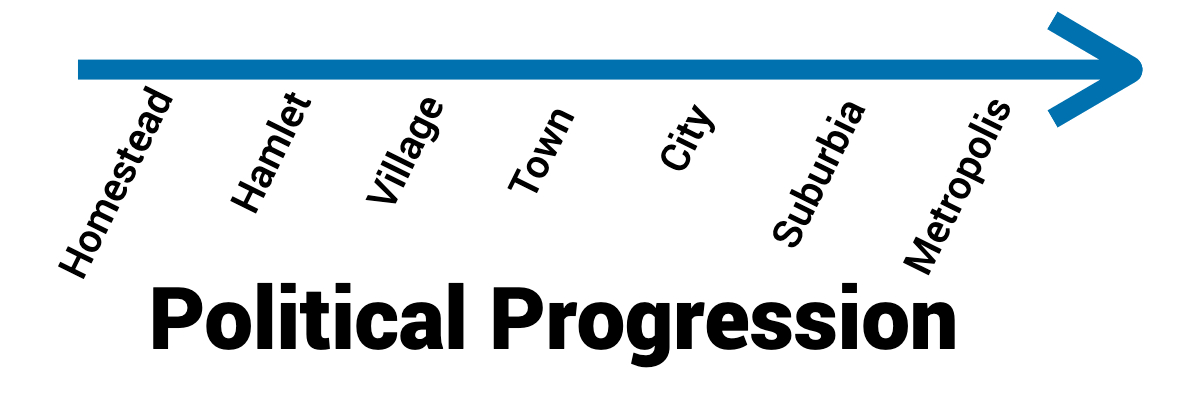
The Hamlet or Township

Staying with this same scenario let’s advance forward a few years. You have had several children that are now married and want to live near you. Next to your house you divide off sections of land for each to build a house. Your children then have other relatives that visit and want to move close to them. More houses are built. Now you have a small township with ten to thirty homes. You are not free to do everything the same as you once did. The more people that come together and try to live together the more freedoms need to be surrendered for everyone to live peacefully together. You cannot just kill anyone that comes to your house. You cannot cause a disturbance to the peace in the middle of the night. Everyone in this small township must agree on certain rules to follow in order to have peace and they pick one person as a sheriff in order to maintain this law. To pay for the sheriff and various other publicly shared municipalities such as a road taxes now have to be levied. They aren’t huge and the people are only taxed when something needs to be done.

Even though you have given up a little bit of your ultimate freedom life is good because you no longer must wear so many hats. One of the women is a medicine woman and has a gift for healing, another resident is a baker, and each person finds unique tasks to specialize in so the whole community can share talent and resources.

Town, City, and Metropolis

As time progresses more and more people call this place home. There is an official town name given. The more people that come to live together the more municipalities there are that need to be created, such as schools, parks, public transportation, and etc. As any community grows in population there are more people that have to decide how to live peacefully together. This is no small task. Every step of growth more freedoms must be surrendered. Traffic lights for example inhibit people from speeding through intersections continuously, but they help give order so that everyone can share the road peacefully.

The difference in ideology between small communities and large cities can be seen today. Most of rural America has a fairly conservative base and the large metropolis cities have a more liberal view. Large cities such as New York City or San Francisco have different problems to solve than small towns like Andover South Dakota. Once upon a time San Francisco was a small farming community much like the small town in South Dakota, but as the city grew the problems that it faced changed and grew with it.

The next time you become upset becomes someone’s viewpoint is too liberal or too conservative this does not mean that either you or the other person is right or wrong. The difference is the time and growth of where you both live or grew up. Eventually the Earth will be just like Coruscant in Star Wars. Coruscant is a planet that is just one giant city. When this happens everyone will be relatively liberal because we will all have similar problems that we will be facing. At the end of the day we are more alike than we give ourselves credit. I believe that if a liberal person was forced to transplant into rural America that he or she would eventually become more conservative because the set of problems faced has changed. The same is true for a conservative person who moves into a metropolis megacity. Unfortunately, there are not many one solution fits all sizes for political issues. This is why I generally believe that states or local governments should be left to make decisions that are best for their residents.


Java New Relic Agent Increases Memory Footprint

Overview

We recently have been upgrading our java stacks to have the latest new relic agent 6 and 7 to incorporate distributed tracing into our environments. In testing the various versions of the new relic agent six we found that our stacks all took a performance hit. We increased our memory usage and increased our latency thus bringing us in danger of meeting our SLAs.

does new relic agent increase memory usage?

In this stack we did a roll back to a version 5 of the new relic java agent. The graph displays differently for the mysql database connection measurements. On the left is version 6.1 on on the right is version 5.3. There is a clear drop in memory usage when we use the older version of the java agent.

Version 7 Analysis

Right now we are currently testing various versions of the 7 release of new relic java agent. We are seeing an increased memory footprint still and many of our stacks are experiencing java garbage collection problems. This causes our stacks to periodically lock up and slow down response times thus triggering alerts. The issues will clean themselves up usually over a period of 30 minutes, however this creates way too many false alarms in our alerting process. Reaching out to the new relic support isn’t very helpful either. Just be cautious in any upgrades you do with the new relic agent after major version 5.